Showing posts with label vegetables. Show all posts

Wednesday, April 4, 2012

Potato and Kale Hash with Poached Egg


Ahh, Spring.  The flowers are starting to bloom, the days are getting longer, the produce selection is greener, and the sun splashes through the windows, painting our rooms with vibrant color.  I love this time of year.

And there's more newness to celebrate - see the changes I've made to the blog?  New header, new background, and I have added print functionality!  You are now able to print off your favorite recipes from my blog.  I tried out a new effect on my photos, too - just for fun and because I felt like doing something different.  It won't be permanent.  Slowly but surely I'm making the changes I've been wanting to for soooo long.  Baby steps {literally}.

We're still awaiting the arrival of our little spring surprise.  The countdown is on.....and it won't be long.  I'm still amazed at the transformation my body has made over the past 9 months.  It's just plain cool that it has known what to do - and a little crazy to think that I've grown a human in my stomach.  But it's such a miracle!  I'm anxious to meet this little guy.

In between writing up birth plans, installing car seats, folding onesies, and cleaning and organizing every corner of this house like a mad woman, I've been nourishing this belly with flavors and combinations I never thought I ever would {curry, especially}.  But this recipe I'm sharing today is pretty classic - and easy.  It's another one of those that you can eat for breakfast, lunch, or dinner.  I had a couple large baked potatoes left over from the weekend and decided that I would cube them and fry up with some onion and organic baby kale.  And because that sounded so boring, I poached a couple eggs and topped the whole deal with them.  Perfectly satisfying, perfectly easy.


Here's to all things Spring!  Happy Eating.

Potato and Kale Hash with Poached Egg
Recipe by A Toast to Taste
Photos by A Toast to Taste

Ingredients Needed:
1 Tbsp olive oil
2 Tbsp butter
2 large par-baked russet potatoes, cubed
1/2 yellow onion, chopped
1 clove garlic, minced
2 cups baby kale {regular is fine, too}
4 poached eggs {or fried}
kosher salt and pepper to taste
crushed red pepper {optional}

In a large pan, heat oil and butter over medium heat.  Add onion and cook for 3-4 minutes until translucent.  Add garlic, followed by potatoes.  Season with salt and pepper.  Stir to combine and cook for about 5-7 minutes, until potatoes are crisp and brown.  Add kale, season with salt and pepper to taste and continue to cook another 2-3 minutes. 

Serve in individual bowls, each topped with 1-2 poached eggs.  Sprinkle with crushed red pepper, if desired.

Enjoy!

Thursday, December 29, 2011

Turkey & Kale Stuffed Shells


This little guy {yes, it's officially a boy!}above wishes you all a belated Merry Christmas, Happy Hannukah, Happy New Year, and everything in between.  After all, we've been absent lately....again.  Seems to be a recurring theme here.  But there has been a whole lot of cooking going on, I promise.  I wish I could have snapped pics of the coffee-rubbed roasted pork butt we did a few weeks back.  To die for.  And the homemade chicken noodle soup, the wheat berry salad with zucchini and tomato, the marinara sauce with a bacon base {Holy Cow!!!}.  Or the Spritz cookies and soft, chewy ginger cookies that all disappeared way too quickly than they should have.  It's been happenin' in the kitchen this month!  But I have no pics to prove it.  Sorry for the taunting.

So, that leads me to today's recipe, one that I did have time to snap - turkey and kale stuffed shells.  This was beyond easy and super healthy.  These are definitely going on the dinner rotation in this house.


Kale is, by far, one of the best green veggies you can eat.  It's full of vitamins and minerals, and has one of the highest antioxidant levels - a perfect cancer fighter.  We need all the nutrition we can get these days so there was no doubt that I was adding a healthy dose of kale to this dish {it's also a good way to hide it - in case you have kids or significant others that can't stand the thought of eating it alone}.  Instead of using ground beef I swapped it out for ground turkey and called it a day.  There are a ton of different ways you can tweak this to your own tastes - go all veg and leave out the meat, or use beef or spicy italian sausage instead of turkey.  Your call.


Another thing I did to make this easy?  I used my favorite jarred pasta sauce - Mezzetta Homemade Marinara.  In my opinion, it's the closest thing to the real deal, and there's nothing funny in it - just straight tomatoes, garlic, and red wine.  If you have homemade sauce on hand, go ahead and use it.  The best part about this dish, though, is that it can be made ahead of time and cooked when you're ready.  And - it makes excellent leftovers.


2011 is soon coming to a close - and my blog is going to be turning 1!  I may have a little something sweet planned.  We have goals to establish for the year ahead, and I'm tickled pink {or blue, I guess} with all the change that's about to take place here at the humble abode.  But I'm wishing you health, happiness, and amazingly good food in the coming year.  Love generously, praise loudly, and live fully.  Happy New Year!
Turkey & Kale Stuffed Shells
Recipe by A Toast to Taste
Photos by A Toast to Taste
Ingredients Needed:
1 lb kale, prepared like this
18 jumbo pasta shells
2 Tbsp olive oil
1 small yellow onion, finely chopped
2-3 cloves garlic, finely chopped
1 lb ground turkey
15oz part skim Ricotta cheese
3/4 cup freshly grated Parmigiano Reggiano cheese
1 large egg
1/4 cup fresh Italian parsley, finely chopped
2 tsp dried Italian Seasoning
kosher salt and freshly ground pepper to taste
1 jar of your favorite jarred marinara sauce {or use homemade}
1/2 cup shredded mozzarella

Preheat oven to 350 degrees.

1.  Cook the shells, kale, and turkey mixture.  Bring a large pot of water to a boil.  Add salt and cook shells according to directions on the package.  Drain and remove to a clean kitchen towel to dry and cool.  Prepare the kale according to the link I've provided.  It's my favorite way to prepare kale and adds a little zip to the dish.  Set aside to cool.  In a medium skillet heat olive oil over medium heat.  Add onion and cook until translucent, 4-5 minutes.  Add garlic, stir and cook for about 30 seconds.  Place ground turkey in pan with onion and garlic.  Stirring frequently, brown turkey until there is no more pink color to the meat.  Remove from heat and set aside.  I combined the kale and turkey at this point.  You can keep them separate if you desire.

2.  Make the filling.  In a large bowl, combine the ricotta, Parmigiano Reggiano, egg, herbs, and spices.  Add the kale and turkey mixtures.  Stir until smooth.

3.  Fill and bake.  Place about 1 cup of tomato sauce in the bottom of a 9x13 baking dish.  Place about 2 Tbsp of the filling into each shell.  You want them full - not bursting.  Place stuffed shells on top of sauce.  Top the shells with the rest of the sauce and sprinkle with shredded mozzarella.  Cover with foil and bake for 30-40 minutes {depending on your oven}.  During the last 10 minutes, remove the foil and brown cheese on top.  Serve and Enjoy!

Tuesday, November 1, 2011

Roasted Butternut Squash Risotto


I'm having a little issue with this thing called consistency lately, especially when it comes to this blog.  But I have to be honest, between the full-time job, work travel, and this sudden urge to nest, I really haven't had much time to post, nonetheless cook.

Nest?  Yes, now is probably the time to tell you that my husband and I are expecting our first baby next spring.  We are pretty darn excited......but with that comes a list a mile long of things we'd like to get done to the house before this little beauty arrives.  And this just leads to another reason why the posting has come to a halt - not only did I not have the time, I down right wasn't cooking for a period of about 6-7 weeks.  My diet consisted of cereal, cheese and crackers, and apples {on a good day}.  Nothing worth blogging about, that's for sure.

But, now I'm back to normal {if there is such a thing when you're pregnant} and back to cooking.  Thank goodness because fall is one of my favorite times of year to cook, and this roasted butternut squash risotto is an annual tradition in my kitchen.  Rich, creamy, and just plain 'ol good.  My husband loves it.  I love it.  It doesn't last long when I make a batch.  It's all really quite simple to make, too.   I know many people will disagree with me, but I actually love to make risotto.  It's therapeutic at times, but really it's just amazing to watch the rice transform.  And it's a great arm workout to boot.


I skinned, chopped, and cubed half a butternut squash {I had a huge one, use a whole one if yours is smaller}.  Drizzled the cubes with olive oil, kosher salt, and fresh ground pepper and roasted at 375 degrees for 45 minutes.  I removed from the oven and set aside to cool.  Then I started the risotto.  My number one piece of advice has always been to use homemade chicken stock when making risotto - it makes such a difference in the taste.  If you don't have any ,the boxed kind will do but you will have to doctor up the flavors a bit.  Once the risotto is finished, I added in the squash, stirred just until incorporated and served.

I promise to be a little more consistent here in the future......so be prepared for more fall goodness.

Happy Eating!

Roasted Butternut Squash Risotto
Recipe by A Toast to Taste
Photos by A Toast to Taste

1 small butternut squash {or half a large one} skinned, cubed, and roasted
1.5 cups arborio rice
2 Tbsp olive oil
3 Tbsp butter, divided
1/2 yellow onion, diced
1/3 cup white wine (use one that you would drink)
4.5-5 cups chicken stock (preferably homemade)
salt and pepper to taste
handful of parmessan cheese

In a medium saucepan, heat chicken stock over low heat.

In a large skillet, heat oil and 1 Tbsp butter over medium heat.  Add onion and cook until translucent, about 4 minutes.  Add arborio rice and stir to coat with onion mixture.  Cook until slightly browned, about 2 minutes.  Pour in wine, stirring frequently, and cook until absorbed.  At this point, season with salt and pepper.  Add 1/2 cup of broth, stirring constantly, until absorbed.  Continue to add a 1/2 cup of broth at a time, stirring constantly, and letting each addition be absorbed before adding the next.  Rice should be creamy and tender when done (about 20-25 minutes).

Remove from heat, add squash, 2 Tbsp butter, and parmessan.  Stir to combine well.  Serve and enjoy!

Monday, October 10, 2011

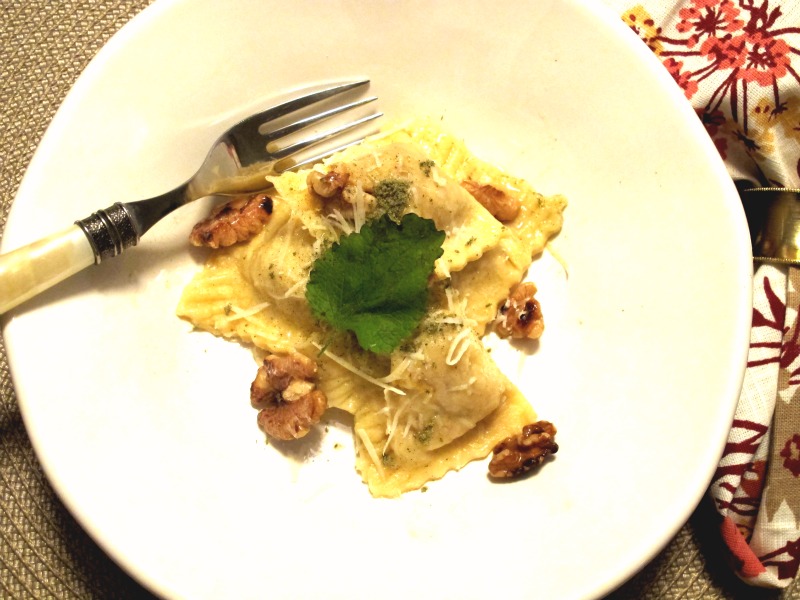
Pumpkin Ravioli with Brown Butter Sauce and Toasted Walnuts


It's fall.  My "fruit" bowl is now overflowing with squash varieties, pumpkins, and pears.  This is probably my favorite time of year.  The leaves are ablaze in oranges and reds, signaling yet another change of the seasons {and wardrobes and home decor and menu options}.  But it's all good because we have homemade pumpkin-stuffed ravioli.  Ohhh, do we ever.


This is going to be short and sweet because words simply cannot describe how dreamy this stuff is.  We made it two weeks in a row because it is absolutely addicting.  The key to this dish is to use homemade noodles and  real roasted pumpkin - not the canned kind.  It's amazing how rich the flavors are from the real stuff.  It's so worth the extra work.  This recipe happend by chance - I got a small pumpkin in the farm share a couple weeks back and really wasn't in the mood for baking a pie {I'm not really much a baker}.  So, what better way to use it up than to roast it and stuff it into some homemade noodle sheets?  Yeahhh.

Here is my recipe for homemade noodles.  You will want to skip the part about passing the noodles through the cutter setting.  You won't be cutting these into a shape - you just want the thinly rolled sheets.  I also don't use a ravioli machine that shapes and cuts for you.  I just do it by hand - and I find it quite fun {but that's just me}. 

In the spirit of fall, I seriously hope you try these.  They are out of this world!

Pumpkin Ravioli with Brown Butter Sauce and Toasted Walnuts
Recipe by A Toast to Taste
Photos by A Toast to Taste

Ingredients Needed:

For the Filling:
1 small pie pumpkin, peeled, cubed, and roasted {I roast with olive oil, salt and pepper}
2 small shallots, chopped and sauteed in butter
1/3 cup freshly grated pecorino romano cheese
1/4 tsp ground nutmeg
dash cayenne pepper
dash kosher salt

For the Sauce:
1/2 stick butter
1/3 cup walnuts, toasted
dash of dry rubbed sage

For the Noodles:
Link is in the post above.  Make 1 batch.

Makes about 18 raviolis.

Start with the filling.  Place roasted pumpkin in the bowl of a food processor and pulse until smooth.  Remove to a separate bowl and add in sauteed shallots, grated cheese, nutmeg, cayenne pepper, and salt.  Stir together until well combined.  Set aside.


Then make the noodles.  Place rolled sheets on a well floured cutting board or countertop surface.  Using a tablespoon, scoop pumpkin mixture and place in the center of noodle, one after the other, spaced about an inch apart, leaving about an inch on each end.  Fold top part of noodle over the pumpkin mounds and press together with the bottom part of the noodle.  Using your pointer and middle finger, press down between the mounds, making sure to remove any air pockets that may exist.  Then, cut the ravioli using either a knife or pasta cutter in between the mounds to create individual raviolis.  Take a fork and press the edges together to prevent them from popping open during the cooking process.


At this point you will want to start melting your butter in a large skillet over medium heat.  Then drop the raviolis into a pot of boiling salted water.  These will only take about 2-3 minutes to cook through, if that.  Keep your eye on them.  Once they float to the top, they are done.  Drain and place in a large serving bowl.  Once the butter has foamed and smells nutty, remove from the heat and pour over the raviolis.  Add toasted walnuts and sprinkle with dry rubbed sage and freshly grated pecorino.  Gently toss and serve!

Friday, September 23, 2011

Zucchini Fritters


I'm baaaaaack!  It's been a while friends, but as you can guess, things are all sorts of crazy over here.  Crazy but really exciting.  And what the heck!  It's the first day of Fall already.  I remember writing a few months ago that all I hoped for was sunny skies and warm temps....well, now I'm really looking forward to sunny skies and crisp air.  Followed, of course, by lots of warm apple crisp {made by Mom}, oodles of Chili {made by Mom}, and pumpkin bars with cream cheese frosting.  Notice a theme here?  Mom, if you're reading - I need your fall recipes!  And fast!

One thing is for sure, we got some beautiful zucchini from our CSA this summer.  The whole roasting routine got old so I thought it would be fun to try out something new - zucchini fritters.  They are kind of like crab cakes but without the crab.  I have to admit I will definitely be making these again.  My husband {not traditionally a lover of zucchini} devoured them.  Served with roasted garlic mashed potatoes, these fritters hit the spot.


I shredded 3 small zucchini into a bowl lined with a paper towel, squeezed the shreds to get out as much water from the zuch's as possible, added 2 slightly beaten organic eggs, 1/2 cup organic breadcrumbs, and about 1/3 cup of grated pecorino romano cheese.  Then I seasoned with a dash of kosher salt and pepper, formed small handfuls into patties and then "fried" in a large skillet with olive oil.  So good.  And just because Summer is technically over that doesn't mean you can't still enjoy a good zucchini.....

Happy Eating!


Zucchini Fritters
Recipe inspired by Martha Stewart Living, August 2011
Photos by A Toast to Taste

Ingredients Needed:
3 small Zucchini, shredded and squeezed {to get the water out}
2 large eggs, slightly beaten
1/2 cup breadcrumbs
1/4-1/3 cup pecorino romano cheese, grated
Kosher Salt and Pepper to taste

In a large bowl, combine the shredded zucchini, eggs, breadcrumbs, and cheese.  Stir together until well combined.  Season with salt and pepper.  Once mixture is combined, form into patties about 1/2" thick.  Fry over medium high heat in a large skillet filled with enough olive oil to completely coat the bottom (about 1/4").  Remove fritters to a cookie rack with a paper towel underneath so they can drain.  Sprinkle with a dash more of kosher salt.  Serve and Enjoy!

Wednesday, August 31, 2011

Stuffed Peppers


I never like being a "debbie downer" but lately I just can't get my mind off loss. Sure, we all lose things, games, jobs, etc. But human life is a whole different story. A few weeks back, I read the story of fellow food blogger Jennie, who shared news that she had suddenly lost her husband to a heart attack. Her story left me in tears for days, literally paralyzed at the thought. The ten year anniversary of 9/11 is coming up. Again, more loss of human life to remember. Then we have earthquakes and hurricanes ransacking the lives of those out east. It's all just a little too much right now - but it's suddenly a big fat reality check that I sure have a lot to be thankful for in my life.   And it's certainly a reminder to hug those we love a little more often.


Despite my haze, I've still been cooking - life must go on after all.  We have been getting some beautiful peppers in the farm share the past couple weeks and I was so excited to use them up.  One of the things I always love to do with them is stuff and bake them off until soft and brown around the edges.  I usually do a stuffing made with meat but this time I went all veg.  I sauteed some onion, summer squash, zucchini, and tomato {all from the farm} in extra virgin olive oil, garlic, and a dash of dried basil.  Then I steamed up some brown rice and added that to the mix.  I then stuffed the peppers, topped with a sprinkling of shredded mozzarella, and baked until the cheese was just golden and peppers were soft.  The key is to cook the peppers for about 10 minutes before stuffing them.  That way the cheese on top doesn't burn and the insides just finish in the oven.


These were excellent - fresh, light, and full of flavor.  My husband and I devoured them for dinner - and ate them for lunch the next day.


Stuffed Peppers
Recipe by A Toast to Taste
Photos by A Toast to Taste

Ingredients Needed:
2 large peppers - any color {I had green and purple}, seeds removed, sliced in half lengthwise
extra virgin olive oil
1 small onion, diced
1 small summer squash, diced
1 small zucchini, diced
1 small tomato, diced
1 cup brown rice, cooked
1 clove garlic, minced
1 tsp dried basil
1/3 cup shredded mozzarella cheese
kosher salt and pepper to taste

Preheat oven to 400 degrees.  Line a baking sheet with tinfoil and spray with cooking spray.  Place peppers cut side down on foil and bake for 10 minutes.

While peppers are baking, heat olive oil in large skillet over medium heat.  Add onion, squash,  and zucchini.  Cook for about 5-7 minutes, until onions are translucent and the squash and zucchini are just cooked {you don't want them too soft}.  Add garlic, basil, salt and pepper.  Stir and cook for another minute.  At the very last minute, add in tomatoes and brown rice.  Cook on heat for about 2 minutes.  Remove from heat.

Remove peppers from oven and flip them over to stuff {careful, they will be hot}.  Spoon in veggie and rice mixture to each pepper half.  Top with shredded mozzarella.  Return to oven for about 5 minutes or until cheese is just golden on top.

Serve and enjoy!


Friday, August 19, 2011

Farm Fresh Corn Salad with Garbanzo Beans, Tomato, and Feta


The corn has arrived!  Corn, corn, corn....part of me is utterly happy about it, but the other part of me is secretly crying inside because this symbolizes the end of summer.  Tear...

The Back to School section has been set up for weeks now at my local Target.  The air is a bit crisper at night, and my taste buds are yearning for everything pumpkin.  How does this happen?!

I love a good corn on the cob but sometimes it's nice to enjoy it off the cob.  I created this salad as a way to enjoy the oodles of corn we've been getting from the farm the past couple weeks.  It's fabulous - sweet, crunchy, and nummmmy.  This salad is really easy to make, too.  Boil the corn, cut the kernels from the cob, add it to a warm skillet with olive oil, season with Old Bay, add in garbanzo beans, tomatoes, and fresh dill.  Cook for about 3-4 minutes.  Add in feta.  Stir until incorporated and serve!  Easy as that, and a lovely match for dining alfresco on the patio on a mild summer evening.


I will relish in these last few weeks of summer sunshine and warmth.  And eat corn.  Lots of corn.

Enjoy!

Farm Fresh Corn Salad with Garbanzo Beans, Tomato, and Feta
Recipe by A Toast to Taste
Photos by A Toast to Taste

Ingredients Needed:
6 ears of corn, cooked and kernels cut from cobs
2 Tbsp olive oil
1 cup cherry or grape tomatoes, sliced in half
1 15oz can garbanzo beans (I used TJ's organic)
2 tsp Old Bay Seasoning
1 Tbsp fresh dill, chopped
1/2 cup crumbled feta
salt and pepper to taste, if needed

Heat olive oil in large skillet over medium heat.  Add corn and cook for about 2 minutes.  To the corn add tomatoes, beans, Old Bay, dill, and salt and pepper if needed.  Stir to incorporate and cook for 3-4 minutes.  Remove from heat and add feta.  Stir together and serve!


Friday, August 12, 2011

Summer Squash Ribbon Salad


It's the dog days of summer - and Lily has decided that she will enjoy them inside lounging on the couch in the AC.  This is how our basset hound x springer sleeps.  So odd.....and incredibly un-ladylike.

But let's get to the matter at hand.  Summer squash ribbon salad.  We've been grilling a lot.  I always like to pair grilled food with a nice, simple, fresh side dish of some sort that takes very little effort, and preferably doesn't require an oven.  This dish is it. 


I don't think there's anything more beautiful than ribboned summer squash.  Look at that - so delicate and full of color.  I sliced up these beauties {yes, using my mandoline} and sauteed in some olive oil with crushed garlic.  Threw in some toasted pine nuts and fresh basil, seasoned with a dash of salt and pepper and voila!  Done.  The perfect side dish for any grilled masterpiece.  We ate this right up, including my husband, who is usually not a fan of any type of squash.  In fact he said to me, "I'd make this again."  Two thumbs up!!


The dog days of summer allow us to be a just a little lazy, right?  Right?

Well, whatever.  This salad is well worth the laziness.

Happy Eating!

Summer Squash Ribbon Salad
Recipe by A Toast to Taste
Photos by A Toast to Taste

Ingredients Needed:
2 medium summer squash or 1 large, sliced thin the long way
2 Tbsp oilive oil
2 cloves garlic, crushed
1/4 cup pine nuts, toasted
fresh basil, julienned - as much as you like
kosher salt and freshly ground pepper to taste

Heat olive oil in large skillet over medium heat.  Add in crush garlic cloves, cook for about 1 minute or until they start to crackle in the pan.  Remove and set aside.  Add squash ribbons, season with salt and pepper.  Cook for about 3-4 minutes or until they start to soften.  Add pine nuts.  Cook for another minute.  Remove from heat and stir in fresh basil.  Serve and enjoy!


Tuesday, August 2, 2011

Summer Vegetable Tian


Bambi paid me a visit the other day in the yard.  One of the things I love most about working from home is that I have 24/7 access to all the nature that surrounds us.  We live on a marsh that serves as home to a plethora of wildlife at any given point during the year.  My office is on the second floor of our home, and my desk is within eye shot of our picture windows that overlook all the beauty.  I literally get to watch the seasons go by as I work away.  I feel so lucky.  Lily loves to stare out the windows with me and watch in awe all that passes through on any given day.

In between nature watching and working, I cook.  It keeps me sane, and I'm thankful to have a husband that eats most of what I make.....especially this dish I'm sharing today.

Summer vegetable tian.  What is a tian, you ask?  It's a dish that originated in Provence, France, that features thinly sliced vegetables and herbs that are layered and then baked.  I absolutely love the way this dish looks - the color, the pattern.  It gets me everytime.  But, alas, the masterpiece must get eaten.  And it's quite delicious, not to mention extremely healthy for you as well. 


I used yellow summer squash, zucchini, and eggplant (of course from our CSA) in my tian this time.  I layered them all on a bed of caramelized onion with tarragon.  The taste is amazing - the tarragon just adds this depth of flavor that I can hardly describe in words.  Top everything with some cherry tomatoes and breadcrumbs and bake for about 45 minutes until golden on top.  This is the perfect side dish for any type of grilled fish or chicken.  I used the leftovers in quesadillas the next day.  To die for.

This is a must try this summer.  Happy Eating!

Summer Vegetable Tian
Recipe by A Toast to Taste
Photos by A Toast to Taste

Ingredients Needed:
2 Tbsp olive oil, plus more for drizzling
1 medium onion, sliced
1 Tbsp fresh tarragon, roughly chopped
1 large yellow summer squash, thinly sliced
1 large zucchini, thinly sliced
1 medium eggplant, thinly sliced
1/2 cup cherry tomatoes
3/4 cup breadcrumbs
1 Tbsp butter, melted
salt and pepper

Preheat oven to 375 degrees. 

I suggest getting everything prepped before assembly.  So, I sliced all my veggies, with the exception of the tomatoes ahead of time.   That way I had everything ready to go and assembly was a cinch.  I used my mandoline to do the slicing this time - highly recommend!


In a medium skillet, heat olive oil over medium heat.  Add onions and cook until soft and brown, about 15 to 20 minutes.  Stir in tarragon.  While the onions are cooking down, I tossed all the other thinly sliced veggies in a big bowl and drizzled with a bit of olive oil and seasoned with a dash of salt and pepper.  Set aside until ready for layering.  When the onions are done, pour the mixture into the bottom of a baking dish of your choice.  I used my 6-inch round. 


Now comes the fun part. Layer the squash, zucchini, and eggplant on top of the onions, making a pattern of your choice. I followed the shape of my baking dish. Top the vegetables with the cherry tomatoes.

In a small bowl, combine melted butter and breadcrumbs. Stir until well incorporated. Pour over vegetables.


Bake for about 45 minutes or until breadcrumbs are golden brown. I did bake mine with the top on for about 20 minutes and then removed for the last half of baking.

Serve and Enjoy!

Monday, July 25, 2011

2 for 1 Monday! Summer Panzanella and Cool Cucumber Salad

Today you're getting two recipes for the price of one!  Why, you ask?  Because two is always better than one.  And because I just got back from Vegas and couldn't help myself....all that gambling and heat went straight to my head.  Mostly, because I really have been cooking and need to get through my backlog of recipes.  Who doesn't love two for one anyways?  Especially on a Monday or a happy hour.


Let's start with the Panzanella.  My girl Ina Garten is at it again - she got me hooked on yet another dish of hers.  And this one just screams summer with all the fresh veggies in it.  I love the mixture of textures and flavors in this salad - crunchy, tangy, a bit salty .  I would never think to put bread in a salad but it works here - just make sure you add it right before you serve otherwise it will get soggy.  The colors are amazing - in fact, it was almost too pretty to eat.  I can't say enough good about this salad.  It works as a side or as a meal on it's own - add grilled chicken or better yet, grill all the vegetables.  If I'm ambitious enough, I may just do that next time.....and trust me, there will be a next time with this one.

You can find Ina's recipe here.  I did tweak a couple things - instead of toasting the bread in a skillet on the stove, I baked them in the oven at 375 degrees with a little olive oil and a dash of kosher salt until slightly golden.  Also, I didn't have any Champagne Vinegar on hand so I substituted with White Balsamic.  It worked perfectly.  Enjoy this one freshly made.


Moving on to the Cool Cucumber Salad.  We got a few beautiful cucumbers in our CSA box this last time around.  I'm always stumped as to what to do with them besides using them as crudites.  Going back to our German roots (really I just wanted to use my new mandoline), I made this cucumber salad with thinly sliced cucumbers, white vinegar, fresh dill, onion, sugar, and a bit of water.  I let it all marinate in the fridge for about three hours.  The result?  A perfectly cool, refreshing, not-too-overwhelming vinegar and cucumber salad.  I was amazed.  My husband couldn't get enough of it.  I think the whole container was gone in about two days.  So good!


Just a couple words on cucumbers - it really is best if you can use the organic variety.  Cucumbers are one of the top twelve foods with the highest level of pesticides used in the growing process.  If you are unable find organic, you may want to consider peeling the skin off.  If you're not concerned, go for the whole shabang! 


I also highly recommend using a mandoline to slice the cucumbers thinly, or you can use the slicer disc with your food processor.  Unless you're a master at knife precision, I don't recommend going that route.  I used my new mandoline (which I LOVE) on both the cucumbers and onions.  So slick!

There you have it!  2 recipes for the price of 1 - all on a Monday.  Now that's what I call a great happy hour.

Happy Eating!

Cool Cucumber Salad
Recipe by A Toast to Taste
Photos by A Toast to Taste

Ingredients Needed:
2 large cucumbers (preferably organic), thinly sliced
1 small white onion, thinly sliced
2-3 Tbsp fresh dill, roughly chopped
1/2 cup white vinegar
1/4 cup cold water
2 Tbsp sugar
dash of pepper

Place sliced cucumbers in the bottom of a 9x13 dish (glass if you have it).  Top with onion, dill, vinegar, water, sugar and a bit of pepper.  Stir together until well combined and sugar is completely dissolved in liquids.  Cover and refrigerate for about 2-3 hours, stirring once an hour.  Serve and enjoy!

Friday, July 15, 2011

Grilled Veggie Pasta with Slow Roasted Tomatoes and Garlic Scape Pesto


I welcomed summer with open arms and a simple train of thought - I truly thought I was going to be doing all this fabulous cooking, sipping cocktails on the patio, letting the time just slip by slowly.....well, that clearly hasn't happened.  At all.  I can probably count on two hands how many meals I've actually put together, and can definitely count on one hand {in fact, closer to one finger} the number of times I've sat on the patio with cocktail in hand, lazily sipping as the leaves rustle in the light breeze, and the crickets create their evening music.  Instead we've been doing things - which isn't bad, I'm not complaining.  BUT, I could go for some summer now.  I want to be lazy for a bit.  I want to make popsicles and eat salad for dinner.  I want to eat lunch under the umbrella and maybe have a cold glass of white wine with it, too.  Is this too much to ask? 

CSA season is in full swing and I've got loads of goodies to create a healthy, fresh meal with.  Yahoooo!  Last week I was prepping easy meals for my husband before my work trip this week.  I cooked up a storm and could probably include five recipes just in this post alone.  But I've picked my favorites and will share those today. 

Garlic Scapes


Last week we got a lovely bunch of garlic scapes in our CSA box.  The first time I got these I had no clue what to do with them.  This year I decided to make pesto with them and use it in a pasta dish with grilled veggies and slow roasted tomatoes.  I fell in love with this dish.  So much flavor, so fresh, super healthy, and so summery for cripes sake!!


Slow roasted tomatoes.  Ina Garten {my absolute favorite} got me hooked on these.  She has an amazing recipe that I've used numerous times and it never fails me.  It's simple - slice your tomatoes, not too thin - and if you're using roma tomatoes, slice in half and spoon out the centers - drizzle with good olive oil, minced garlic, basil, salt, pepper, and one teaspoon of sugar.  Cook at 250 degrees for 2 hours and voila!  You now have slow roasted tomatoes that you can use for anything.  Use them in omelettes, add to sandwiches, salads, or pasta, eat them plain, whatever you want.  I cannot get enough of these. 

For the rest of the veggies, we grilled up some yellow summer squash and zucchini from our CSA as well.  Are you catching the theme yet?  Ya, I love my CSA.  It's all good.  I tossed all the veggies with some whole wheat penne, spicy Italian chicken sausage, and the garlic scape pesto, then topped with the slow roasted tomatoes and a sprinkle of pecorino.  I simply cannot explain how great this was.  mmm, mmm, mmm.  My mouth is watering just thinking about it.


I hope you have all had a chance to enjoy the summer!  I'm off to enjoy it now.....there's a cocktail calling my name on the patio....

Grilled Veggie Pasta with Slow Roasted Tomatoes and Garlic Scape Pesto
Recipe by A Toast to Taste
Photos by A Toast to Taste

For the Pesto
1 bunch of garlic scapes, about 15-20 scapes
1 cup fresh basil
1/2 cup fresh parsley
juice of half a lemon
1 tsp salt
1/2 tsp pepper
1/2 cup parmessan cheese, grated
1/4 cup pine nuts
3/4 cup olive oil

For the Pasta
1 lb whole wheat pasta, short-cut like penne or rigatoni
1 yellow squash, cubed and grilled
1 zucchini, cubed and grilled
6 green onions, grilled
4 spicy Italian chicken sausages, grilled
slow roasted tomatoes, as many as you want, I used 7
pecorino romano cheese, grated

In a food processor fitted with a steel blade, add garlic scapes, basil, parsley, garlic, lemon juice, pine nuts, salt, pepper and parmessan cheese.  Puree.  With the processor running, slowly drizzle in olive oil until well blended.  Set aside.

Cook pasta according to directions.  Drain and pour into large mixing bowl.  Add grilled squash, zucchini, green onions, sausage, and pesto.  Stir together until pasta is coated with pesto.  Top with tomatoes and a sprinkle of pecorino.  Serve and enjoy.